
The 30-Day Audit-Readiness Roadmap
An audit rarely becomes difficult on the day an auditor arrives.
The difficulty usually starts much earlier—when asset records are incomplete, ownership is unclear, documents are scattered across systems, maintenance histories are inconsistent, or teams cannot confidently answer a basic question:
“Can you show me the evidence?”
Audit readiness is therefore less about preparing a large collection of documents at the last minute and more about creating a reliable operational record throughout the asset lifecycle.
A practical audit readiness roadmap should help teams move from uncertainty to evidence in a structured way.
The goal is not to make everything perfect in 30 days. The goal is to establish visibility, identify gaps, correct critical records, document what matters, and test whether the organization can actually produce evidence when required.
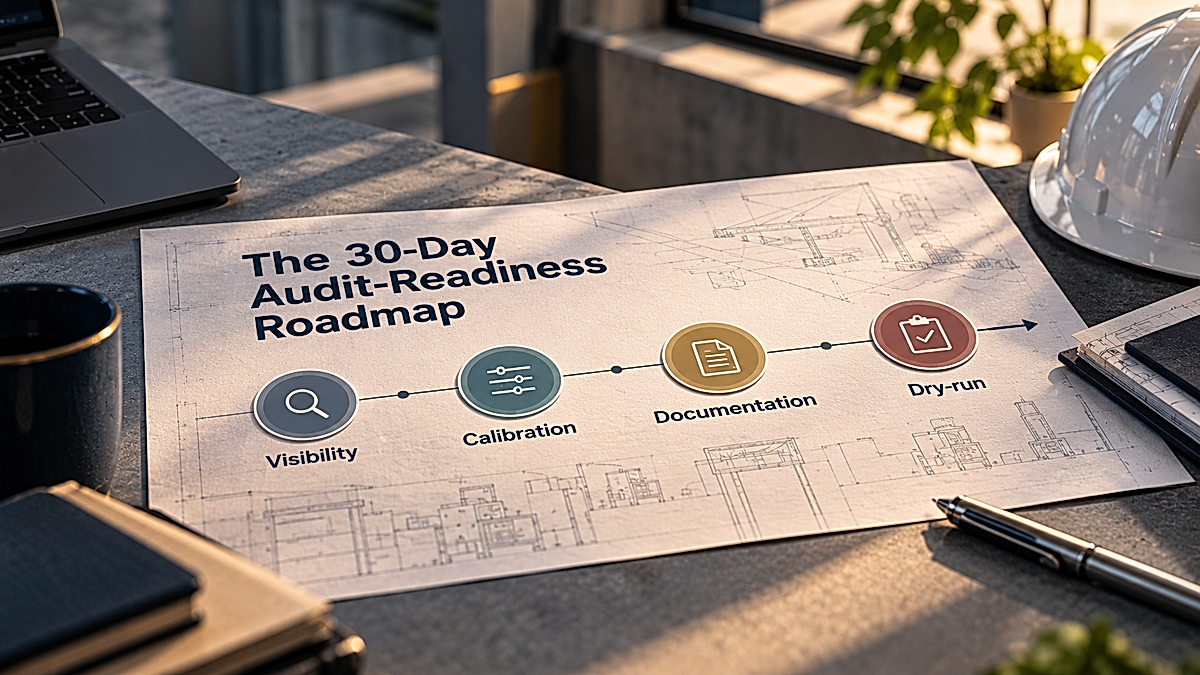
This roadmap breaks that work into four stages:
Visibility → Calibration → Documentation → Dry-run
Each stage builds on the previous one.
Why Audit Readiness Starts With Visibility
Before correcting records, teams need to know what they actually have. Consider a simple asset audit.
An organization may have thousands of physical assets across plants, warehouses, offices, and field locations. The asset register might contain most of them, but that does not necessarily mean the information is audit-ready.
Some assets may have:
- Missing serial numbers
- Incorrect locations
- Outdated ownership information
- Duplicate records
- Missing maintenance history
- Expired certificates
- Unattached inspection documents
- Incomplete warranty information
- Unknown operational status
The first question should therefore not be:
“What documents do we need for the audit?”
It should be:
“What is the current state of our assets and evidence?”
That distinction changes the entire preparation process.
Week 1: Establish Visibility
The first seven days should focus on building a clear picture of the current state.
Do not start by attempting to fix every record. Start by establishing the baseline.
1. Build the Asset Universe
Create a single working list of the assets, equipment, systems, or other controlled items that fall within the audit scope.
Depending on the organization, this could include:
- Production equipment
- IT and network assets
- Safety equipment
- Vehicles
- Tools
- Laboratory equipment
- HVAC systems
- Electrical infrastructure
- Facilities equipment
- Regulated or certified assets
The objective is to answer:
What is in scope?
Without this baseline, teams may spend time preparing evidence for assets that are outside the audit while overlooking assets that are actually critical.
2. Establish the Minimum Data Set
For each asset, identify the information required to establish basic traceability.
A practical baseline could include:
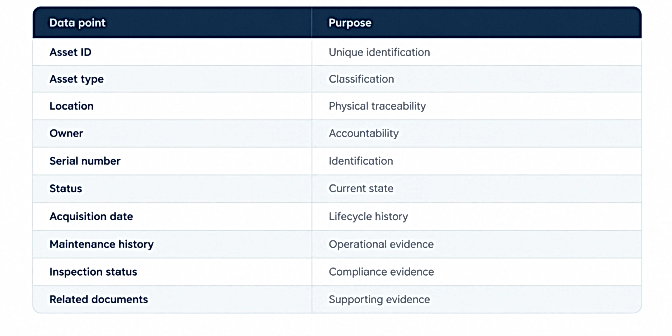
The exact fields will vary by organization and audit requirement.
The important part is consistency.
3. Identify Visibility Gaps
Once the asset universe is established, classify records according to their current condition.
A simple system can use:
Green: Complete and traceable
Amber: Incomplete or requires validation
Red: Missing, conflicting, or unverified
This creates an immediate view of where attention is required.
For example:
78% of assets have complete identification data, 15% require validation, and 7% have significant evidence gaps.
The percentage itself is less important than having a measurable baseline.
4. Prioritize by Risk
Not every gap deserves the same level of urgency.
Prioritize assets based on factors such as:
- Regulatory importance
- Operational criticality
- Safety impact
- Financial value
- Audit scope
- Evidence availability
- Age of records
- History of non-conformance
This prevents the common mistake of treating every missing field as equally important.
Week 1 Outcome
By the end of the first week, the team should have:
- A defined audit scope
- A consolidated asset list
- A minimum data set
- A visibility assessment
- A list of high-risk gaps
- Clear owners for remediation
The output of Week 1 is not a perfect register. It is a reliable starting point.
Week 2: Calibrate the Records
Once visibility is established, the second week focuses on calibration.
Calibration means comparing the information recorded in the system against what actually exists and determining whether the records can be trusted.
This is where discrepancies become actionable.
1. Compare System Records With Physical Reality
For physical assets, perform targeted verification.
Check whether:
- The asset exists
- The asset ID matches
- The serial number matches
- The location is correct
- The asset status is accurate
- The responsible owner is correct
This can be done through physical verification, barcode or QR scanning, photographs, or other controlled identification methods.
The purpose is not simply to collect more information. It is to establish traceability between the physical asset and its digital record.
2. Resolve Duplicates
Duplicate records can create significant confusion.
For example, one physical machine may appear twice in the system because:
- It was transferred between locations
- A replacement record was created
- A spreadsheet was imported more than once
- A new asset ID was assigned without closing the old record
During calibration, identify duplicate records and determine which record should remain authoritative.
3. Correct Ownership and Location
An asset without a reliable owner is difficult to manage. The same applies to an asset with an uncertain location.
Ownership should answer:
Who is responsible for this asset and its required actions?
Location should answer:
Where can this asset be physically verified?
These two fields become particularly important when evidence needs to be collected quickly.
4. Validate Critical Dates
Dates often become evidence during an audit.
Review fields such as:
- Purchase date
- Installation date
- Commissioning date
- Inspection date
- Calibration date
- Maintenance date
- Certificate expiry
- Warranty expiry
Look for impossible or conflicting values.
For example, an inspection date that predates installation should trigger investigation rather than simply being accepted as historical data.
5. Establish an Exception Log
Not every discrepancy can be resolved immediately.
Instead of leaving unresolved issues inside emails or individual spreadsheets, create a controlled exception log.
A useful exception record includes:
Asset → Issue → Risk → Owner → Required action → Due date → Status → Evidence
This turns a problem into a trackable workflow.
Week 2 Outcome
By the end of Week 2, the team should have:
- Verified critical assets
- Resolved high-priority discrepancies
- Identified duplicate records
- Validated ownership and locations
- Reviewed critical dates
- Created an exception register
- Assigned remediation owners
The output of Week 2 is calibrated information that people can trust.
Week 3: Build the Evidence Trail
Visibility tells you what exists. Calibration tells you whether the information is accurate. Documentation provides the evidence.
This is where teams should organize the records required to demonstrate that assets are being managed according to defined requirements.
1. Define the Evidence Required
For each asset category, identify the relevant evidence. Depending on the audit, this could include:
- Inspection reports
- Calibration certificates
- Maintenance records
- Service reports
- Warranty documents
- Purchase records
- Safety certificates
- Operating procedures
- Training records
- Approval documents
- Change records
- Disposal or retirement records
Avoid collecting documents simply because they exist.
The better question is:
What requirement does this evidence demonstrate?
2. Connect Documents to Assets
A document sitting in a shared folder is not necessarily useful evidence. The relationship between the document and the asset should be clear.
For example:
Asset: Compressor-042
Inspection: Annual inspection
Date: 14 September 2026
Certificate: INS-042-2026
Status: Valid
Next due: 14 September 2027
This structure allows a reviewer to move from the asset record to the supporting evidence without relying on tribal knowledge.
3. Standardize Naming
Inconsistent document naming creates unnecessary search time.
Instead of:
scan_final_new.pdf
use a consistent convention such as:
AssetID_DocumentType_Date_Status
For example:
CMP042_Inspection_2026-09-14_Valid.pdf
The exact naming convention can vary, but it should be predictable.
4. Record Document Status
Documents should have an identifiable status.
For example:
- Valid
- Expiring soon
- Expired
- Missing
- Under review
- Superseded
This is particularly important when evidence has an expiry date.
A document repository should not simply answer:
“Do we have a document?”
It should answer:
“Do we have the correct, current document?”
5. Create an Evidence Matrix
An evidence matrix provides a useful bridge between audit requirements and operational records.
A basic structure can look like this:
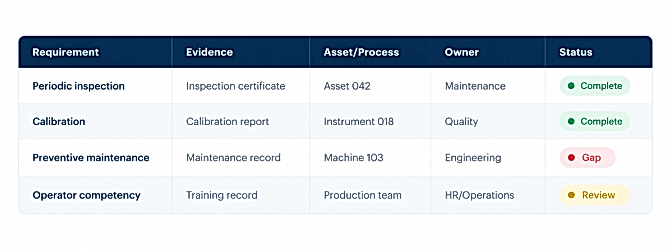
This makes gaps visible before the audit does.
Week 3 Outcome
By the end of Week 3, the team should have:
- Evidence requirements mapped
- Critical documents linked to records
- Naming conventions applied
- Expiry statuses reviewed
- Missing evidence identified
- An evidence matrix established
The output of Week 3 is a traceable evidence trail.
Week 4: Run the Audit Before the Audit
The final week is about testing the system.
This is the stage many organizations skip.
A process can look complete on paper and still fail when someone actually asks for evidence.
The dry-run is designed to expose that gap.
1. Select Sample Assets
Choose a representative sample across:
- Different locations
- Different asset types
- Different owners
- High-risk assets
- Recently acquired assets
- Older assets
- Assets with previous exceptions
Do not select only the easiest records.
The purpose is to test the system honestly.
2. Ask Audit-Style Questions
For each selected asset, ask questions such as:
Can you identify this asset?
Where is it located?
Who owns it?
When was it last inspected?
Can you show the evidence?
When is the next inspection due?
What maintenance has been completed?
Was there a previous exception?
How was that exception closed?
The test should measure how quickly and confidently the team can answer.
3. Measure Evidence Retrieval Time
A useful dry-run metric is evidence retrieval time.
For example:
How long does it take to move from an asset ID to the correct supporting document?
If the answer requires multiple emails, phone calls, spreadsheets, or manual searches, the process still has friction.
The objective is not necessarily to achieve a particular number of seconds.
It is to identify unnecessary dependencies.
4. Test the Exception Process
A good audit-ready system should also explain what happens when something is wrong.
Test scenarios such as:
- Missing certificate
- Expired document
- Incorrect location
- Unassigned asset
- Failed inspection
- Overdue maintenance
- Duplicate record
For each scenario, verify:
Is the issue recorded?
Is an owner assigned?
Is there a due date?
Is the corrective action documented?
Is closure evidence available?
5. Record Dry-Run Findings
Classify findings into categories such as:
Critical: Could materially affect compliance or audit outcome.
High: Significant evidence or control gap requiring prompt action.
Medium: Process or documentation weakness.
Low: Administrative improvement.
Then assign each finding an owner and closure date.
Week 4 Outcome
By the end of the fourth week, the team should have:
- Completed a representative audit simulation
- Tested evidence retrieval
- Identified remaining gaps
- Validated exception handling
- Assigned final remediation actions
- Established an audit-readiness status
The output of Week 4 is confidence—not simply documentation.
The 30-Day Audit-Readiness Checklist
Use the following checklist as a practical starting point.
Days 1–7: Visibility
- Define audit scope
- Establish asset universe
- Define minimum data fields
- Identify missing records
- Identify high-risk assets
- Assign owners
Days 8–14: Calibration
- Verify critical assets
- Check asset IDs
- Validate locations
- Validate ownership
- Identify duplicates
- Review critical dates
- Create exception log
Days 15–21: Documentation
- Define required evidence
- Link evidence to assets
- Standardize document naming
- Review expiry dates
- Identify missing documents
- Create evidence matrix
Days 22–30: Dry-Run
- Select audit sample
- Perform evidence retrieval test
- Ask audit-style questions
- Test exception workflows
- Record findings
- Assign corrective actions
- Complete final readiness review
What Audit Readiness Should Look Like
At the end of 30 days, audit readiness should not mean that every possible record is perfect.
It should mean that the organization can establish a reliable chain:
Asset → Record → Owner → Requirement → Evidence → Status → Action
That chain is what turns scattered operational information into something that can be reviewed and trusted.
More importantly, the process should not disappear once the audit is complete.
If teams only prepare when an audit is approaching, the organization returns to the same problem a few months later.
A better approach is to make audit readiness part of normal asset operations.
When assets are created, their records should be established correctly.
When they move, their locations should be updated.
When maintenance happens, the evidence should be attached.
When certificates approach expiry, the required action should be visible.
When exceptions occur, they should be assigned, tracked, and closed.
That creates a continuous evidence trail instead of a last-minute audit exercise.
From Audit Preparation to Continuous Readiness
The 30-day roadmap is most effective when it becomes the starting point for a repeatable operating model.
Visibility establishes what exists.
Calibration establishes whether the information can be trusted.
Documentation establishes the evidence.
Dry-runs establish whether the organization can actually retrieve and explain that evidence.
Together, these four stages create a practical foundation for continuous audit readiness.
The real measure of readiness is simple:
When someone asks for evidence, can the team find the right record, understand its status, identify its owner, and produce the supporting document without starting an investigation?
If the answer is yes, the organization is no longer simply preparing for an audit.
It is operating with better control over its assets and the information surrounding them.
A Practical Audit-Readiness Template
Teams can turn the roadmap into a simple working tracker:
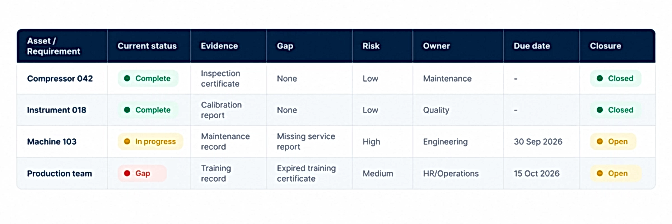
Review this tracker weekly during the 30-day preparation period.
After the audit, retain the same structure as a continuous control mechanism rather than creating a new tracker every time an audit approaches.
Final Takeaway
Audit readiness is not a document-collection exercise.
It is a visibility and control exercise.
A 30-day roadmap gives teams a practical sequence:
Week 1 — See what you have.
Week 2 — Verify what is true.
Week 3 — Connect records to evidence.
Week 4 — Test whether you can prove it.
When these steps become part of everyday asset management, audits become less disruptive, evidence becomes easier to retrieve, and teams spend less time searching for information that should already be available.
The goal is not to prepare for the next audit. The goal is to build an operation that stays ready.
Inflewz Perspective
For organizations managing large and distributed asset environments, the challenge is rarely the absence of information. It is the fragmentation of information across the asset lifecycle.
Inflewz brings asset records, lifecycle information, documentation, workflows, and operational visibility into a more structured environment—helping teams move from scattered records toward a more traceable and audit-ready asset lifecycle.
Asset Lifecycle, Engineered.